Reversing Common Obfuscation Techniques 13/03/2022
Modern software often deploys obfuscation as part of its anti-tampering strategies to prevent hackers from reversing critical components of the software. They often use multiple obfuscation techniques to harden against hackers, kind of like a snowball. Adding more layers of snow increases the size, making it a bigger pain in the ass to penetrate.
In this article, we will have a close look at two common obfuscation techniques to understand how they work and figure out how to deobfuscate/undo them.
Project UnSnowman
That's right, we will be looking into the two different obfuscation techniques as listed below.
IAT Import Obfuscation
Before we start with the actual obfuscation of the IAT import table, let me explain what imports really are.
What are imports?
One of the first things I'd like to figure out about a program when I'm reversing is where it invokes the Operating System. In our case, we will focus on Windows 10 as most video games are only working on a Windows-based operating system. Anyway, for those who didn't know yet, Windows provides a bunch of important Dynamic Linked Library (DLL) files that almost every Windows executable uses. These DLLs contain functions that can be 'imported' by Windows executables, allowing them to load and execute the function of a given DLL.

Why are they important?
Ntdll.dll for example is responsible for almost all memory-related functionality such as opening a handle to a process (NtOpenProcess), allocating a memory page (NtVirtualAlloc, NtVirtualAllocEx), querying memory pages (NtVirtualQuery, NtVirtualQueryEx), and a lot more interesting stuff one may need.
Another such DLL is the ws2_32.dll, which is responsible for almost any network activity by using one of the following functions:
- Socket
- Connect / WSAConnect
- Send / WSASend
- SendTo / WSASendTo
- Recv / WSARecv
- RecvFrom / WSARecvFrom
Now you may ask, what's the point of knowing this? Well, if you take a binary and throw it into a disassembler such as IDA, the first thing a person like me does is check all the imported functions to have a rough idea of what the binary is capable of. For example, when ws2_32.dll is present in the imports then the binary may connect to the internet.
We may now want to take a deeper look and also check which ws2_32.dll functions are used. If we take the Socket function and find out where it's called we can check its arguments, allowing us to easily figure out which protocol and type are used after we google the function name.
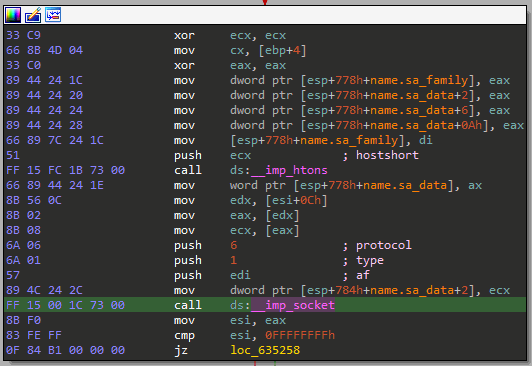
NOTE: IDA has automatically added comments to the disassembly.
Obfuscated Imports
Anyway, those Windows functions reveal quite a lot of information as they are well-documented functions. Therefore one may want to hide its presence to hide what is going on.
All these imports you may see in your disassembler are loaded from the Import Address Table (IAT), which is referenced somewhere inside the PE headers of the executable. Some malware/games try to hide these import addresses by not pointing to the DLL function directly. Instead, a trampoline or detour function may be used.
Examining our Sample
For this example, we are looking at a sample that is using a trampoline-ish obfuscation, as you can see below:
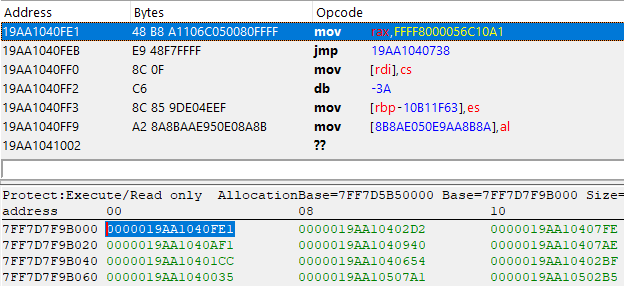
The address below, 0x7FF7D7F9B000 which references our function 0x19AA1040FE1 is looking completely different. You may think this is junk code, but have a good look and you will find out it's not.
Take a good look at the first two instructions, starting with mov rax, FFFF8000056C10A1 followed by jmp 19AA1040738, except everything after that is complete junk. Anyway, let's take that jump and see where it takes us to:
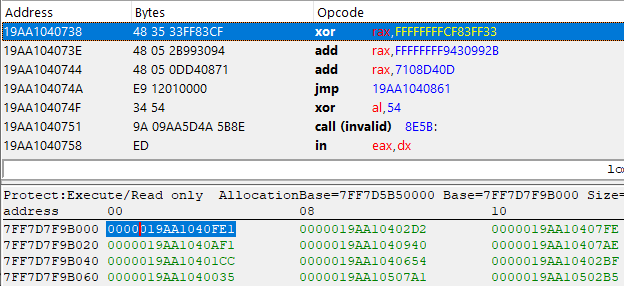
Look at that, 4 more valid instructions, this time it's an XOR and 2 ADDs followed by yet another jump. Let's repeat this process a few more times...
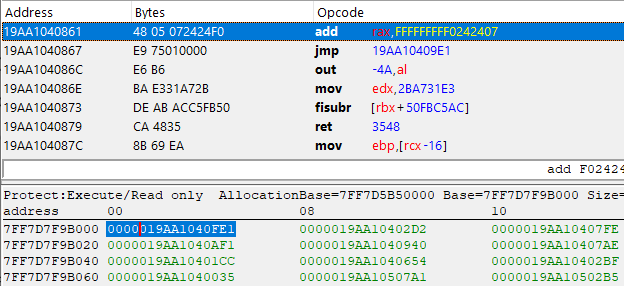
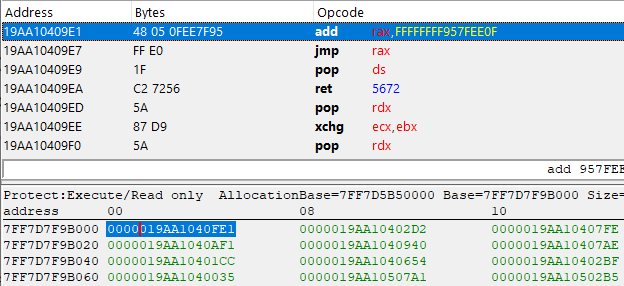
Finally, we reached a jmp rax instruction! In case you didn't notice, all the XOR, SUB, and ADD instructions have been performed on that Rax register, meaning that this may contain the actual pointer of our imported function. Let's do the math and find out.
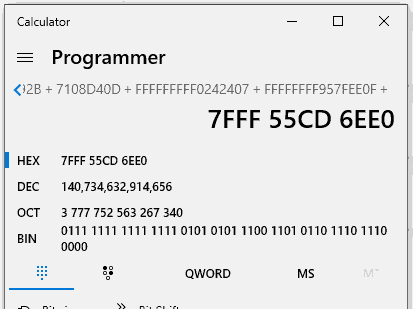
And indeed, after doing the math we obtain the pointer to ADVAPI32.RegOpenKeyExA, cheers!
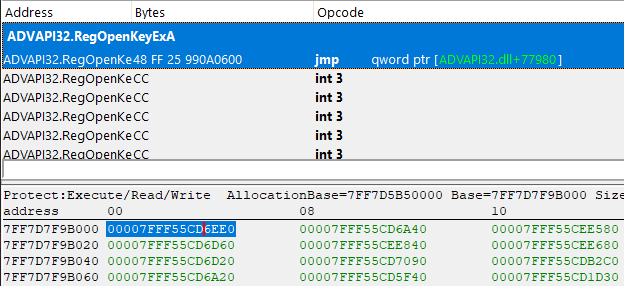
Now, all we have to do is repeat this a few hundred times and we have completely deobfuscated the IAT import tables.
Automated IAT Deobfuscation
I don't think any of you want to repeat this process by hand using the calculator, doing it once was already a pain in the ass. From now on we will be using C# to automate the calculations for us. As you may have seen we only faced ADD, SUB, and XOR operations that were done on the same register. The reason for that is Rax is used as a return address whereas registers such as Rcx, Rdx, R8, R9, and some others are not callee safe and may conflict with the calling conventions. This means we won't even need a disassembler as we can easily differentiate these instructions ourselves thanks to the minimal usage of registers and opcodes.
I'm afraid I won't go into any more details as I explained the obfuscation technique in much detail. Take a good look at ImportFix.cs in the Unsnowman project, the code will be easy to understand if you paid attention to the explanation of the deobfuscation process.
Control-Flow Obfuscation
Another valuable source of information while reversing a binary is the assembly instructions themselves. For humans, they may be hard to understand, but for decompilers such as IDA, we can simply press F5 and IDA will generate that oh-so-sweet pseudo-code that we humans can understand.
One easy way to obfuscate the actual instructions is by using a combination of junk-code together with opaque branching. What this means is that you put junk code right after a branch instruction. The trick is that you use a conditional jump, however, you make sure that the condition is always true so the branch is always taken. What the disassembler doesn't know is that the conditional jump will always be true at runtime, making it believe both sides of the conditional jump can be reached during runtime.
Okay if you're not quite following then let me show you some visuals to help you understand. The first image shows jbe which lands inside another instruction.
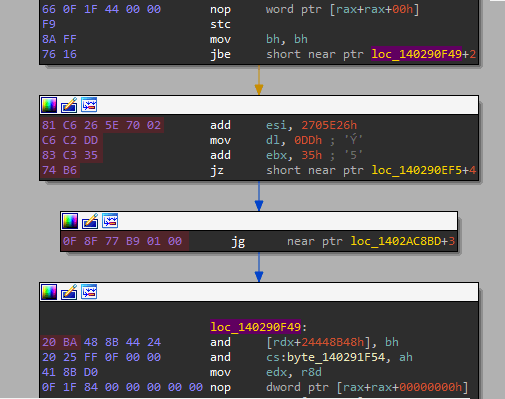
NOTE: The red marked bytes are junk code.
Now take a deep look at the second image below, all I did here was NOP the two bytes of the last instruction so that my IDA reveals the hidden instruction underneath the and [rdx+24448B48h], bh instruction.
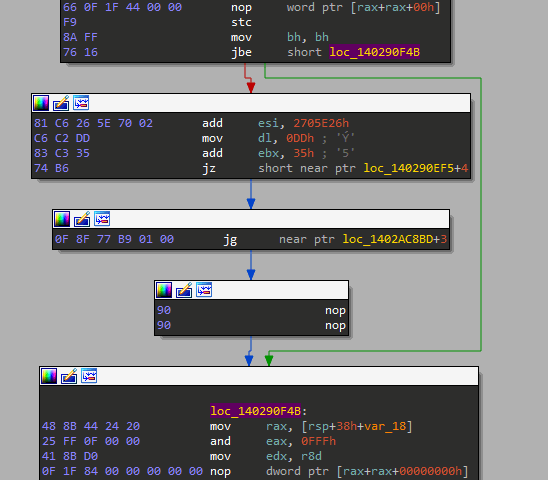
We may also patch the conditional jump with an unconditional one to make sure IDA won't fall for it again.
Before we continue I would like to show one last example as the previous one was a very basic one. Things become a lot more complicated when you start chaining these obfuscated jumps into each other, as you can see in the image below.
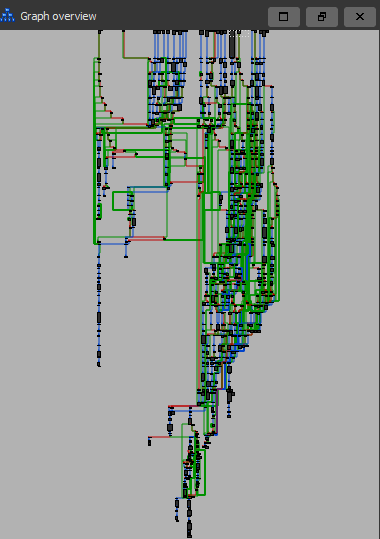
This image only shows the chaos it creates in the control flow, but just imagine how hard my CPU was suffering while IDA did its very best to create this graph based on junk instructions.
Now you may wonder what the deobfuscated functions look like? I'm glad you asked!
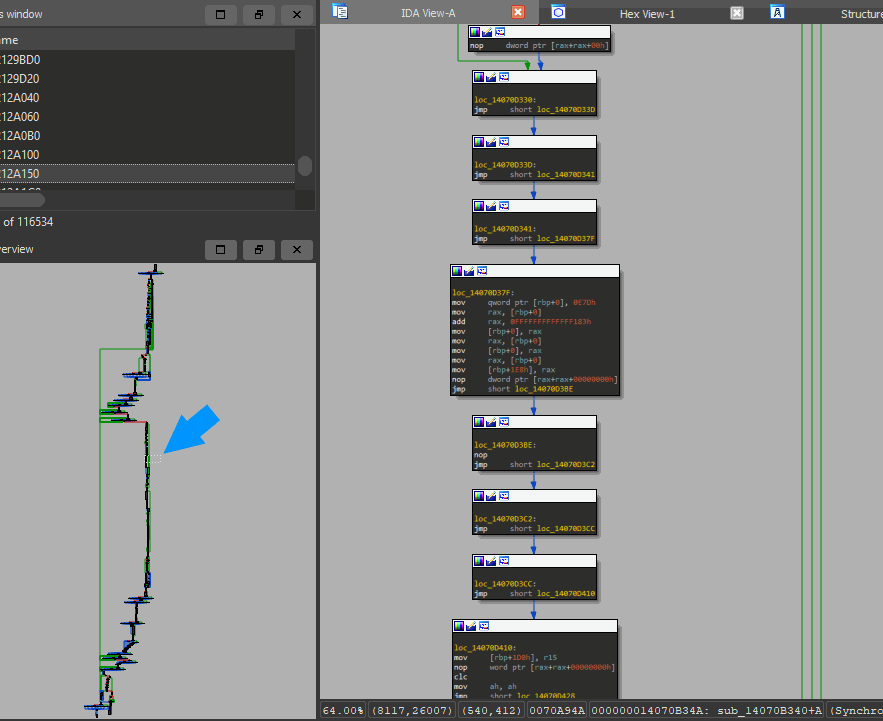
See that little blue arrow I drew on the left side? that shows what the right part is zoomed in on. Now have a look at the right side and you will see seven deobfuscated jumps in just that small part of the function. Just imagine how much time one would need to deobfuscate this manually or semi-automated (IDA script to NOP jmp). Doing that one by hand using an IDA script took me already 40 minutes... and that's just for one damn function. Imagine how many other functions I would need to do to find what I was actually looking for!
Automated Control-Flow Deobfuscation
Okay, so now that we have a good understanding of how it works we just need to automate it. As I mentioned before, I used an IDA Script before to just patch the unconditional jumps and NOP slide the junk out.
However, this still took me 40 minutes to clean as the hardest part was to identify the opaque branches. So how do we solve this? You may think we should examine every conditional jump and check if it's opaque, then NOP slide and repeat? WRONG!
Let me tell you a secret, we don't give a shit about what's opaque or whatnot. All I really care about is that my IDA can give me decompiled code when I hit F5, which indeed won't happen as long as these obfuscated jumps force junk to collide into real assembly instructions.
But does that mean we need to figure out if a conditional jump is opaque or not? nope, all we need to do is check if the jump collides inside an existing instruction and then patch out that instruction as seen in our first example.
DeFlow Deobfuscation Algorithm
Now that we know how to solve the issue we can start diving into the algorithm I came up with to deobfuscate all instances for this kind of obfuscation.
List<ulong> _alreadyDiscovered;

							// Buffer is a copy of the .text section
							function Deflow(byte[] buffer, ulong[] functions)
							  for(int i = 0; i < functions.Length; i++)
								do
								  int newDiscovered = 0;
								  List<ulong> chunks = DeflowChunk(buffer, functions[i]);
								  while(chunks.Count != 0)
									List<ulong> newChunks;
									foreach(var c in chunks)
									  newChunks.AddRange(DeflowChunk(buffer, c));
									newDiscovered += chunks.Count;
									chunks = newChunks;
								while (newDiscovered != 0)


							function DeflowChunk(address)
							  List<ulong> newChunks;

							  // 63th bit indicates if this address was extracted from a negative jump or not
							  bool isNegative = address >> 63 == 1;
							  address &= 1 << 63;

							  // Check if already discovered
							  if(_alreadyDiscovered.Contains(address))
								return newChunks;

							  _alreadyDiscovered.Add(address);

							  ulong lastBranch = 0;      // Indicates our last conditional jump address
							  ulong lastBranchSize = 0;  // Size of the last conditional jump address
							  ulong lastTarget = 0;      // Target location of the last conditional jump
							  int stepsLeft = 0;         // Steps (bytes) left to reach lastTarget from current address

							  // Usage of SharpDisasm
							  var disasm = new Disassembler(buffer, address - base); // NOTE: base = BaseAddress + .text offset

							  foreach(var insn in disasm.Disassemble())
								ulong target = 0;
								ulong lastAddrStart
								bool isJmp = true;

								switch(insn.Mnemonic)
								  // Stop analysing when we encounter a invalid or return instruction while we have no lastTarget
								  case ud_mnemonic_code.Invalid:
								  case ud_mnemonic_code.Ret:
									if(lastTarget == 0)
									  return newChunks; // Only accept when no lastTarget as we may be looking at junk code
									break;
								  case ud_mnemonic_code.ConditionalJump: // all conditional jumps
									if(lastTarget == 0)
									  target = calcTargetJump(insn); // Helper to extract jump location from instruction

									  if(!isInRange(target)) // Helper to see if target address is located in our Buffer
										isJmp = false;
										break;

									  // Check if instruction is bigger then 2, if so it wont be obfuscated but we
									  // do want to analyse the target location
									  if(insn.Length > 2)
										isJmp = false;
										newChunks.Add(target);
										break;
									else
									  isJmp = false; // Do not this conditional jump accept while we already
											 // have a target (might be looking at junk code)
									break;
								  case ud_mnemonic_code.UnconditionalJump:
								  case ud_mnemonic_code.Call:
									if(lastTarget == 0)
									  ulong newAddress = calcTargetJump(insn); // Helper to extract jump location from instruction

									  if(!isInRange(newAddress))
										isJmp = false;
										break;

									  // Add target and next instruction IF not JMP (CALL does return, JMP not)
									  if(insn.Mnemonic == ud_mnemonic_code.Call)
										newChunks.Add(address + insn.PC);

									  // Add instruction target for further analyses
									  newChunks.Add(newAddress);
									  return newChunks;
									break;


								// quick mafs
								ulong location = (address+insn.Offset);
								stepsLeft = (int)(lastTarget - location); // Only valid if we have a lastTarget!

								// Setup a new target if current instruction is conditional jump while there is no lastTarget
								if(lastTarget == 0 && isJmp)
								  lastBranch = loction;
								  lastBranchSize = insn.Length;
								  lastTarget = target;
								else if (stepsLeft <= 0 && lastTarget != 0)
								  // if stepsLeft isn't zero then our lastTarget is located slighlt above us,
								  // meaning that we are partly located inside the previous instruction and thus we are hidden (obfuscated)
								  if(stepsLeft != 0)
									int count = lastTarget = lastBranch; // calculate how much bytes we are in the next instruction
									if(count > 0)
									  // making sure we are a positive jump
									  int bufferOffset = lastBranch - base; // subtract base from out address so we can write to our local buffer

									  // NOP slide everything except our own instruction
									  if(int i = 0; i < count - lastBranchSize; i++)
										buffer[bufferOffset + lastBranchSize + i] = isNegative ? 0x90 : 0xCC; // We use NOP for negative jumps
																											  // and int3 for positive

									  if(!isNegative)
										buffer[bufferOffset] = 0xEB; // Force unconditional Jump

									  // add next instruction for analyses and exit current analysis
									  newChunks.Add(lastTarget);
									  return newChunks;
									else
									  // we are a negative jump, set 63th bit to indicate negative jump
									  lastTarget = |= 1 << 63;

									  // add target to analyser and exit current analysis
									  newChunks.Add(lastTarget);
									  return newChunks;
								  else
									// stepsLeft was zero, meaning there is no collision
									// add both target address and next instruction address so we can exit current analysis
									newChunks.Add(lastBranch + lastBranchSize);
									newChunks.Add(lastTarget);
									return newChunks;

							  return newChunks;
NOTE: this is pseudo-code, I am aware it doesn't run! (seriously)
Pretty big huh? little more difficult to understand than the IAT Import deobfuscation as we used an actual disassembler library to get the size and mnemonic of each instruction. Using the disassembler is almost a must as we also had to figure out if an instruction collided with each other.
There are plenty of comments in the pseudo-code to give you a better understanding of how things should work. You may now also take a look at the real (Deflow algorithm) used in the Unsnowman repo.
DeFlow Algorithm Explained
The main function will keep track of already discovered chunks while it recursively invokes DeflowChunk for the linear disassembly.
Keeping track of newly discovered chunks is done through lists and loops as it would trigger a StackOverflow due to the high amount of branching instructions that can be done in a single block.
The DeflowChunk will first check if we encounter a given branching instruction and perform one of the following actions if so
Ret- Stop if nolastTargetis setInvalid- Stop if nolastTargetis setConditionalJump- Calculate target address and follow if in range of our bufferUnconditionalJump- Calculate target address and save for further analysis if in range of our bufferCall- Calculate target address and save for further analysis if in range of our buffer
In case we don't have a lastTarget set we will check if the current instruction is a ConditionalJump that jumps within the range of our buffer (isJmp flag) and set the lastTarget to the destination of the ConditionalJump.
Once we have such lastTarget we take our current instruction pointer and subtract it by lastTarget to calculate how many more bytes we need to disassemble (stepsLeft).
After calculating the stepsLeft we check if the value equals zero. If the value is above zero we will continue the linear disassembly.
When the stepsLeft is below zero it means that the assembly has collided with the next instruction. This most likely means that our last ConditionalJump that was responsible for setting our lastTarget is an opaque condition, meaning our current chunk will most likely never be executed and is instead used to overlap the next few legit assembly instructions.
We can fix this by patching the first byte of our ConditionalJump to 0xEB, making it an UnconditionalJump. To clean things up a little more we also patch all bytes between the last ConditionalJump and lastTarget.
This process is then repeated multiple times for every call or conditional jump it finds during its linear disassembly process.
Conclusion
Not only malware but also legitimate software like video games tend to use these kinds of obfuscation techniques to hide as much valuable information in the hope to prevent the reversal of the software. However, as you have seen we have successfully deobfuscated these two techniques and were able to reveal all hidden information.
Originally I was going to benchmark a popular video game where one instance is the original binary and then benchmark again but with a deobfuscate binary - which should use fewer resources due to removal of junk and opaque branching - to then see how much of a performance impact these obfuscation techniques have. But due to my legal history, I decided not to do so.
Anyway, we can still conclude that these obfuscation techniques do a very good job of wasting my valuable time, which is a good way to prevent people from reversing software. On top of that, the Deflow algorithm itself takes several minutes/hours (depending on the file size) to deobfuscate the complete control flow of a binary.
With that being said I hope you learned something from my journey.
Oh and for those who didn't notice, or in case you scrolled all the way down to find a download link... you can find the Unsnowman source code at my GitHub, cheers!
You can study the DeFlow pseudo-code instead ;)
