Lua Devirtualization Part 2: Decompiling Lua 28/03/2021
For this article I will start by taking a deep look into Lua 5.1 and then continue to create a Lua Decompiler from scratch in C#, not only will this be used to decompiler Lua, but it will also be used to identify and lift the Luraph instructions back to original Lua instructions (in Part 3).
Please note that you do NOT need to read the previous article to understand this one, this article will only focus on the Lua VM and my very own Lua Decompiler.
This article is part 2 of 4, you can find a complete overview of all the articles below:
Lua Compiled
During the compilation process, most of the original data gets lost. Programming languages that compile to virtual bytecode are designed for a virtual run-time environment, those languages are often called scripting languages. Most scripting languages like Lua, Python, Java, Javascript, and so on can be compiled to a virtual instruction set (aka virtual bytecode). Our goal for today is to turn Lua's virtual instructions back into human-readable code.
Lua Functions
Compiled Lua binaries are a collection of one or more Lua Functions, every Lua Function is made out of the following components:
- Instructions
- Upvalues
- Constants
- Debugging Info
Lua Instructions
Each Lua Function of course comes with a collection of instructions, these instructions are what we referred to as Lua Bytecodes.
The instructions are specific to the Lua VM, and since this article is all about Lua version 5.1, we will continue to work with Lua 5.1 for the decompiler.
The Lua instructions themselves are 4 bytes in size and contain the bytecode identifier (opcode) together with the value of registers A, B, and C.
Lua bytecodes are disassembled using the following snippet (src/Core/LuaInstruction.cs:136):
public LuaInstruction(int data)
{
    // |      C      |      B      |     A      | OpCode  |
    // | 0000 0000 0 - 000 0000 00 - 00 0000 00 - 00 0000 |

    OpCode = (LuaOpcode)(data & 0x3F);
    A = (data >> 6) & 0xFF;
    B = (data >> 23) & 0x1FF;
    C = (data >> 14) & 0x1FF;
}
Lua Upvalues
Upvalues are commonly used to reference a local variable between multiple functions. These upvalues make it possible for a parent function to pass a reference to a local variable to one of their child functions. This may be a little bit tricky to understand, but it will become more clear when we get to the actual decompiling of the upvalues.
Lua Constants
Each Lua Function has an array of Lua Constants. Lua Constants are basiclly Objects in Lua, they can be a String, a Number (Float/Double), or just null. The number is either a float or a double depending on the compiler settings. This array of constants is saved inside the compiled Lua binary and will be accessed during runtime.
Debugging Info
Remember how compilers lose information when they compile files? Lua has a 'solution' for this, by default, Lua compilers will add additional data that is not necessary for the runtime environment but instead is used for us, humans, to help us debug our scripts when needed. This debugging information exists of local variable names, upvalues, and even line numbers. Debugging information will most likely not be present in virtualized scripts such as Luraph because the debugging info is not required for the run-time environment. Therefore I will not go into more detail nor will I support this in the decompiler (at the time of writing).
Lua VM
The Lua VM is the piece of software that is responsible for interpreting Lua bytecodes while also handling the memory. This piece of software can be found on GitHub (mirror) or somewhere on the official lua.org website. Maybe I should mention that the official Lua website is at lua.org, but I assume most people are familiar with GitHub, so my preference is the GitHub mirror.
VM in a nutshell
Since the complete Lua VM is a little out of scope for this article, I will just sum up a few basic things we need to know before we continue.
The VM has 3 main registers, A, B, and C. Register A is 8-bit while registers B and C are 9-bits. Register B and C are combined to form the 18-bit register Bx.
The final register is sBx, which is just a signed interpretation of the 18-bit register Bx.
One important thing to know is the usage of registers B and C, they are both 9-bit long while register A is only 8-bit long.
This is done for the reason that registers B and C are often used to reference a Lua Constant, this is done by setting the most significant bit.
Lucky for A, Lua instructions only use a maximum of 2 constants at a time, so register A shouldn't have to worry about his small size ;).
Another important fact you may want to know is that the sBx register is only used in the JMP instruction, because the only time Lua may need a negative number is whenever it performs a branch/jump.
Decoding
Before we can start decompiling we must first get a better understanding of what each Lua instruction represents. Each Lua instruction is unique and has its own logic, to give you an idea of how they work I will start with explaining a few common Lua instructions.
Example Instructions
MOVE 1 0The first thing you notice is that there are only two numbers after the instruction, and that is because the
MOVE instruction only uses registers A and B.
To have an overview of all the Lua bytecode you can take a look at the Lua's lopcodes.h on GitHub (mirror).
Not only do we know which registers the MOVE uses, but also what it should be doing.
For the MOVE instruction, it is R[A] := R[B], which means that it moves the value of register B into register A, meaning that MOVE 1 0 is just var1 = var0.
Believe it or not, but we have almost decompiled that MOVE instruction. The only thing that is missing is that we may need to prepend the local keyword for the first variable to indicate that var1 is a local variable that has not yet been used.
And there we go, our first instruction, MOVE, can be decompiled like that.
But unfortunately, not every instruction is as easy as the MOVE instruction, lets take a look at the CALL for example.
OP_CALL, /* A B C R[A], ... ,R[A+C-2] := R[A](R[A+1], ... ,R[A+B-1]) */
Opcode CALL uses registers A, B and C in a more complex way, but fear not, it's actually pretty simple once you understand what is going on.
To explain this one, I will start by throwing an example at your face.
CALL 3, 4, 1 -- A B C
var3, var4 = var3(var4, var5, var6)
Take a good look and try to understand how those numbers related to their variables... go ahead, I will wait...
Figured it out? it should not be too hard to see the relation between the variables and the register values.
First of all, we need to know that there are three sections, the first one is the return values, the second one is the function name and the third one is the arguments.
Register C will indicate whether there are return values or not, the amount of return variables is defined by C while the start index of the return variables is defined by A.
Section two, which, isn't much of a section, its just the variable holding the function reference. The function is defined by register A, the function reference is almost always passed into a variable before it gets called.
Section three, the arguments, they start from A+1 and end at A+B-1.
Another thing you may have noticed is that the return variables and the arguments are all next to each other, which makes sense because Lua only has three main registers for each instruction.
Before you lose your shit, keep in mind that that the vast majority of the Lua instructions are pretty basic, the JMP instruction for example doesn't even have to be decompiled at all.
Of course, we have to figure out where it will jump to, but the JMP instruction itself does not represent any code since Lua doesn't have 'goto' labels or whatever.
The only tricky part here is that we do need to know where they jump to so that we can define the execution flow of the program, but that's for later on.
Before we move on to decompiling I need to show you one last example that is critical in Lua.
As you may have noticed with the MOVE instruction, it will only pass the value from one variable to another, so now the real question is, how do we get a value inside a variable?
Loading a value into a variable is done by using the instruction LOADK, which stands for 'load constant', meaning that it will load a value from the lua constant list.
The LOADK does this OP_LOADK,/* A Bx R[A] := K[Bx] */, you will notice that register Bx is used, this is done because Lua constants are accessed by setting the 9th bit of the register.
For example, Bx = 5 (0000 0000 0101) means var5 while Bx = 261 (0001 0000 0101) means Lua constant with index 5. Keep this one in mind because when dealing with if-statements we must identify if the Bx register is either referred to as a variable or a constant.
Before you continue (TL;DR), I would like to show you how my decompiler handles such constants and variables. The function WriteIndex will take care of this by checking if the 9th bit is set to determine if the register is referring to a constant or not.
Another thing the function does is prepend the keyword local in case the local variable has not yet been seen before.
Function WriteIndex can be found at src/Decompiler/LuaScriptLine.cs:471 and is shown below.
public string WriteIndex(int value, bool useLocalKeyword = true)
{
    bool constant = false;
    int index = ToIndex(value, out constant);

    if (constant)
        return this.Func.Constants[index].ToString();
    else
    {
        if(this.Func.ScriptFunction.UsedLocals.Contains(value))
            return "var" + index;
        else
        {
            this.Func.ScriptFunction.UsedLocals.Add(value);
            if (useLocalKeyword)
                return "local var" + index;
            else
                return "var" + index;
        }
    }
}

public int ToIndex(int value, out bool isConstant)
{
    if (isConstant = (value & 1 << 8) != 0)
        return value & ~(1 << 8);
    else
        return value;
}
More Instructions
Let's not forget that the Lua 5.1 instruction set contains a total of 38 Lua instructions, so you may want to check out how my decompiler handles all of them.
The decompiler uses a big switch table at src/Decompiler/LuaScriptLine.cs:67 to decompiler each instruction individually and attempts to generate a premature output.
Just keep in mind that this is a very premature output, the output will, later on, be improved by analyzing on a few higher levels.
Decompiling
We have already managed to perform a very pre-mature decompiling based on the instruction level which we will be using in the next few levels. The next two analyses are going to be done in Block level and Function level, this means we will no longer look at a single instruction at a time, but instead, look at a collection of instructions to get a better idea of what it's doing.
Blocks
One of the important things to do is group our Lua instructions into smaller groups, we will split the instructions whenever we see branch instructions. This is important because every branch instruction means that the control flow can change. From now, I will use the word 'Block' to refer to such groups of instructions.
Once the blocks are split based on the branch instruction, we will iterate them again and split them once more whenever a block jumps to a location that is not the start address of a block. This is often the case with if statements, the block will, later on, be used to define the end of the given if statement (or loop).
Defining our blocks
Most blocks are pretty similar, they all contain Lua instructions that they will execute, but in the end, there are usually (not always!) two instructions we need to keep track of.
One of them is the branch instruction (JMP) that we talked about previously, and the other one is the condition instruction (IF-statement).
The condition instruction will usually decide whether or not to jump over a branch instruction or not. even tho a condition instruction DOES modify the instruction pointer, we will not keep track of that because condition instructions are only capable of increasing the instruction pointer by one, meaning that a condition instruction is almost always placed before a branch instruction. A branch instruction will then modify the instruction pointer to change the flow of the execution. This may be a little trick, but the reason Lua handles conditions like this is that there simply are no flag registers that the Lua VM can use to save the result of a condition.
The decompiler uses the GenerateBlocks function at src/Decompiler/LuaScriptFunction.cs:141 to create a list of blocks based on the existing list of Lua instructions.
All blocks have the property JumpTo to indicate where their branch instruction jumps to (if any), and another property called JumpNext which is just the address of the next block (if any).
Block Graph
For shit and giggles, I have forked the graph view from my U8Disasm project and implemented it for our Lua decompiler.
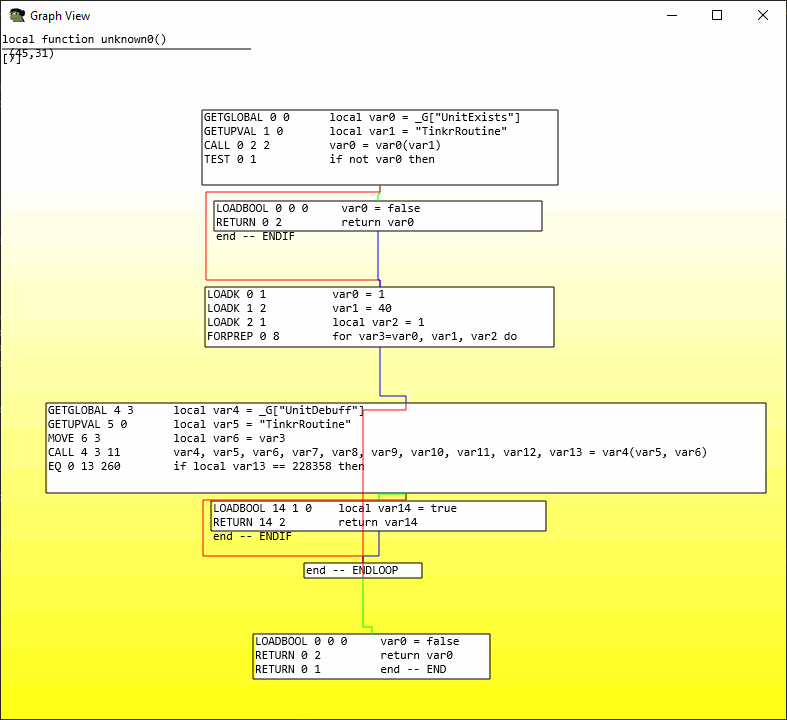
The results are... questionable, but at least you can see the blocks I have been talking about. On the left side are the Lua instructions while on the right side is the decompiled output (final result).
NOTE: Please note that the output in the screenshot is from a very early stage of the decompiler.
Block Definitions
We iterate over all blocks using the logic found at src/Decompiler/LuaScriptFunction.cs:251.
The blocks are split into 4 different categories, each block category is defined based on their JumpTo and JumpNext values, have a look at the rules below:
IF=JumpTo != -1 && JumpNext != -1*ELSE=JumpTo != -1 && JumpNext == -1ENDIF=JumpTo == -1 && JumpNext != -1END=JumpTo == -1 && JumpNext == -1
IF block must have a condition instruction and must NOT have opcode FORLOOP.
IF blocks can decide where they jump to based on their condition while ELSE blocks don't have much to decide, instead, they just jump to the end of the IF statement to prevent the execution of the next block, which, presumably is the second body of the IF statement.
The ENDIF block is the exact opposite of the ELSE block, here the ENDIF block won't have the possibility to jump, instead, it will just continue the execution because it has passed the IF code body's already.
Finally, the END block is just.. the end. There are no more instructions left after that block meaning that we have reached the end of the Lua function.
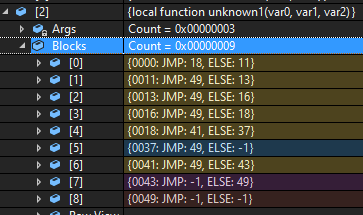
Have a quick look at the above screenshot, the yellow highlighted lines are IF blocks, blue for ELSE blocks, purple for ENDIF, and brown for END.
But there is one thing we are missing, and that is multi-line IF statements.
Combined If Statements
Multi-line if statements are a pain in the ass, the block definitions look promising, but there is one thing we are missing.
We do not yet know how the IF blocks relate to each other. In our example, there could be 5 different IF statements, or there could be just 1 big IF statement with 5 conditions.
Let me show you the original Lua script that was used to generate the output of the colored blocks, I will highlight the below code based on its block color.
 local function getSqSegDist(pv, p1, p2)
     local x = p1.x
     local y = p1.y
     local z = p1.z
     local dx = p2.x - x
     local dy = p2.y - y
     local dz = p2.z - z
     if dx ~= 0 or dy ~= 0 and x == p1.x and dz ~= 0 then  -- Blocks 0 to 3
         local t = ((p.x - x) * dx + (p.y - y) * dy + (p.z - z) * dz) / (dx * dx + dy * dy + dz * dz)
         if t > 1 then  -- Block 4
             x = p2.x
             y = p2.y
             z = p2.z
         elseif t > 0 then  -- Block 6
             x = x + dx * t
             y = y + dy * t
             z = z + dz * t
         end
     end
     dx = p.x - x
     dy = p.y - y
     dz = p.z - z
     return dx * dx + dy * dy + dz * dz
 end
Hopefully, you can see the boundaries of the blocks, you should be able to see that the first IF statement is combined from blocks 0 to 3, the next IF statement is a single condition from block 4, and the final IF statement is an ELSEIF statement from block 6.
To figure out if two or more IF blocks that are located next to each other are the same IF statement we have to check their end location.
The decompiler takes care of this at src/Decompiler/LuaScriptFunction.cs:270 by locating the last IF block in the IF block chain.
So in our case, that would have been block 4 for the first chain.
The decompiler starts at block 4 and then iterates to the start of the if chain (block 0), while iterating over the IF blocks, it will check the JumpTo location because every last IF will jump to the END of their IF-block.
This way we know the END of the last IF block and can now check the IF block (3) that comes before the last IF block (4).
In our example, block 3 will not jump to the same END location as block 4, meaning that block 3 is no longer a part of the current IF chain, therefore we have to detect a new IF chain.
The other remaining blocks (3, 2, 1, and 0) will jump to the same END location as block 3, meaning that blocks 3, 2, 1, and 0 are located inside the same IF chain.
Another fun brain teaser is the determination of the keyword and and or combined with the fact that Lua has a "reverse" flag.
Since Lua has a very limited amount of instructions, Lua can "reverse" the state of a condition instruction.
For example, Lua has the instruction EQ which stands for "Equal" which means if X == Y, but Lua has no instruction for not-equal.
Therefore Lua uses the same EQ instruction, but instead, it will set the register A to reverse that state, meaning that the EQ opcode with register A == 1 means if X ~= Y.
But no worries about that, the decompiler again checks the JumpTo value of the block to identify whether or not to use the and or or keyword.
For those who really want to lose their mind, have a look at src/Decompiler/LuaScriptFunction.cs:310.
Please note that this algorithm has only been tested on a limited amount of Lua code snippets and that it may break in unexpected situations.
Result
Finally, we have created the basic logic that is required to decompile Lua binaries. please do keep in mind that this decompiler was developed for purely educational use and that it is not a 100% working project. There are still a few things like loops, closure, upvalues and varargs that we have not discussed in this article, but are included in the project. Without further ado, it's time for an example that should showcase everything discussed in this article.
Compiler input:
local up1 = "up1"
local up2 = "up2"

local function test1(a, b, x, y)
    if b == x then
        if a == 0 and b ~= 1 or x == 99 and y ~= 0 then
            print("check 1")
            if x > 0 then
                print("check 2")
            else
                print("nope")
            end
            x = b
        end
        print("done")
    end

    function intest()
        print("upvalues check: " .. up1 .. up2)
    end
end
Decompiled output:
function CRoot() -- Decompiler did this
local var0 = "up1"
local var1 = "up2"
    local function unknown0(var0, var1, var2, var3)
        if var1 == var2 then
            if var0 == 0 and var1 ~= 1 or var2 == 99 and var3 ~= 0 then
                local var4 = _G["print"]
                local var5 = "check 1"
                var4(var5)
                if 0 < var2 then
                    var4 = _G["print"]
                    var5 = "check 2"
                    var4(var5)
                else
                    var4 = _G["print"]
                    var5 = "nope"
                    var4(var5)
                end
            var2 = var1
            end
        var4 = _G["print"]
        var5 = "done"
        var4(var5)
        end
        function intest()
            local var0 = _G["print"]
            local var1 = "upvalues check: "
            local var2 = var0
            local var3 = var1
            var1 = var1 .. var2 .. var3
            var0(var1)
        end
        var4 = intest
        var0 = "up1"
        var0 = "up2"
        _G["intest"] = var4
    end
    local var2 = unknown0
    var0 = var0 -- _ENV (upvalues)
    var0 = var1
end
We can see that the output is not exactly the same as the input, and that is thanks to the Lua compiler. But that doesn't mean the results are wrong, in fact, the output should give the same functionality as the input. To improve the decompiled output, we could try to optimize a few things, for example, take a look at the instructions below:
function intest()
    local var0 = _G["print"]
    local var1 = "upvalues check: "
    local var2 = var0
    local var3 = var1
    var1 = var1 .. var2 .. var3
    var0(var1)
end
Which basically means
function intest()
    print("upvalues check:" .. var2 .. var3) -- var2 & var3 are upvalues
end
Optimization is pretty much a must-have for when we want to achieve proper deobfuscation, so we will look into that soon enough.
For those who didn't find the GitHub link already, the complete Lua 5.1 decompiler project can be found at ferib/LuaToolkit.
Online Lua Decompiler
Don't have .NET environment setup? then check out the online version.
I have hosted a demo website at lua-decompiler.ferib.dev so everyone can use the decompiler with ease.
Not only can you use the easy UI, but there is also an open REST API in case you into that.
The complete demo website for the Lua decompiler can also be found on GitHub at ferib/LuaDecompiler-Web.
Conclusion
We have had a detailed look at some of the most used Lua instructions and figured out how to disassemble them and performed the first step of the decompiling process. After that we continued by dividing the instructions into Blocks, which we then used to perform higher-level analyses on to get a better understanding of the control flow. The results of the decompiler are not perfect, but we have seen that the decompiler is giving pretty decent results on basic Lua code, and I believe that we can achieve perfect results when the decompiler gets improved.
SoonTM, I will attempt to de-virtualize the Luraph script that we have seen in the previous article and publish my findings in great detail with the goal of creating my own improved obfuscation based on wherever Luraph fails.
Next article: Part 3: Devirtualizing Luraph