Lua Devirtualization Part 3: Devirtualizing Luraph 24/02/2022
For this article, I will combine all the tools I have created and perform a deep analysis of how well the most common virtualization is implemented. On top of that, I will also try to find out how we can make virtualization better and at which (performance) cost.
This article is part 3 of 4, you can find all other articles below:
Please make sure you have read the previous two parts before you continue.
Luraph
For those who still don't know yet, Luraph is an obfuscator that is done by virtualizing the original Lua script with the main goal to hide what is going on. Luraph seems to achieve this by compiling the Lua script, separating the instructions from each function, lifting/'renaming' the Lua instructions to Luraph instruction, and then packing the heap data (constants, upvalues, etc).
Today is all about undoing that, not only will we achieve this through manual analyses but we will also use the tools from the previous article to automate the devirtualization process.
Table of Content
To keep everything organized and easy to find I will split the article into the following sections below:
- The internals of Luraph
- Unpacking Luraph
- Lifting like a Forklift
- Encoding to compiled Lua
- Decomping Lua
- Conclusion
The internals of Luraph
Before we can devirtualize Luraph we must understand how Luraph performs virtualization, therefore I will start by showing you the pseudo-Lua code of a Luraphed script.
-- use locals to hide func refferences
local funpack = unpack
local fpcal = pcall
local fsetfenv = setfenv
local fsetmetatable = setmetatable
local ftype = type
local fgetfenv = getfenv
local ftostring = tostring
local ferror = error
local fstringsub = string.sub
local fstringbyte = string.byte
local fstringchar = string.char
local fstringrep = string.rep
local fstringgsub = string.gsub
local fstringmatch = string.match
local ftableinsert = table.insert

-- more locals used to hide more refferences
-- <...>

-- Luraph VM
local function VMRun(LPH_String, arg2)
-- NOTE: pre-unpacking
-- Do: LPH string to byte table (with duplicating byte X)

-- NOTE: Helpers
local function LPH_GetBytes()
local function LPH_GetDWORD()
local function LPH_GetFlagBit(flag, start, bitEnd)
local function LPH_unknown0() -- decrpyt QWORD?
local function unk_bitxor() -- bitwise xor function? (helper for helpers)
local function LPH_GetEncryptedDWORD() -- guessed
local function LPH_GetString(arg1) -- unk arg

-- NOTE: basic unpacking
-- Do: table_loop1

-- NOTE: the real unpacking function
local function LPH_UnpackData()

-- NOTE: Interpreter
local function LuraphInterpreter(data, env, arg3)
-- Do: setup initial data
local function Main(...)
	-- Do: setup more initial data
	local function unk(...) -- handle VARARGS?
	local function InterpretFunc()
		while true do
			-- Do: interpret Luraph bytecode
		end
	end
	-- Do: error handling
end
setfenv(Main, env)
return Main
end

-- NOTE: here is where it all goes into action
local unpackedData = LPH_UnpackData() -- NOTE: Just breakpoint this and dump the 'unpackedData' table
return LuraphInterpreter(unpackedData, env)()
end
VMRun("LPH!42069<...>", getfenv()) -- invoke Luraph VM
Have a good look at that, you should be able to recognize this if you read the first part, but just to be sure I will sum up the things you should know:
Luraph Variables
Below are some Lua variables that I will mention a lot since they are a key component of the Luraph VM.
LPH_String: Luraph string containing VM data (prefixed withLPH!)LPH_Table:LPH_Stringconverted to a table (without the prefix)LPH_Index: Index for the LPH data unpacking (using while unpacking)VIP: Virtual instruction pointer (used while interpreting)
Luraph Main Functions
VMRun: Initialise and starts the Luraph VMLPH_UnpackData: Complete unpacking ofLPH_Table
Luraph Helpers
Luraph utilizes a lot of helper functions that are used for the unpacking of the LPH contents, some of those helpers do more than just unpacking it and may also perform decryption techniques to reveal the actual content from the LPH data.
LPH_GetBytes: Gets 1 byte from the LPH tableLPH_GetDWORD: Gets 4 byte DWORD from the LPH tableLPH_GetFlagBit: Does bitwise stuffLPH_unknown0: Unknownunk_bitxor: bitxor look-a-likeLPH_GetEncryptedDWORD: Gets 1 byte and XOR's to DWORDLPH_GetString: Gets 1 byte for string length and then continue to take the string
Those helpers are used in the unpacking stage, you may notice that I didn't bother too much reversing them as you will see why later on.
Unpacking Luraph
Unpacking is done inside the VMRun function by taking the LPH_String string, removing the "LPH!" prefix and then convert pairs of 2 chars to a hexadecimal value.
One little thing you should note is that there is a 'repeater' byte, this repeater looks something like 3X where X is the repeater byte and 3 equals the number of times the next 2 chars should repeat themselves.
After the LPH_Table is generated we see a bunch of helper functions that get defined, after those helper functions is a small loop and two more function definitions.
Those next two functions are LPH_UnpackData and LuraphInterpreter accordingly, which get invoked at the end of the VMRun function.
The most important thing of the unpacking process is that we can just breakpoint the last line of the VMRun function, right before it calls the LuraphInterpreter function.
And thats exactly what I will be doing for now, I did in fact look into the whole LPH_UnpackData function in the hope to reverse it and be able to unpack the LPH_String myself.
But the actual goal of this article is to just devirtualize Luraph and automate the process, which shouldn't be a problem since we can just implement a Lua VM into our project, load in the Luraph script, and pause the Lua VM execution at the exact point we want.
We will do this by placing a breakpoint at the LuraphInterpreter call and then dump the contents of unpackedData, which should do the trick.
Dumping Unpacked Data
Below is the output of the unpackedData after sucesfully dumping the contents:
{1, 1, 2, 2, 2, 2, 2, 2, 2, 2, 2, 2, 2, 2, <...> }
{
4,
0,
{2, 2, 2, 2, 2, 2, 2, <...> 2, 2},
{
{nil, nil, 4, 5, nil, 9999999, 0, 0, nil, 0, [115435] = 0},
{nil, nil, 15, 6, nil, "pairs", 1, 1, nil, 0, [115435] = 1},
{nil, nil, 15, 7, nil, "TaxiNodeCoords", 2, 2, nil, 0, [115435] = 2},
{nil, nil, 27, 6, nil, nil, 2, 2050, nil, 4, [115435] = 2050},
<...>
{nil, true, 2, 4, nil, nil, 271, 4879, "Name", 9, [115435] = 4879},
{nil, nil, 7, 152, nil, nil, 158, 23710, nil, 46, [115435] = 23710},
{nil, nil, 7, 134, nil, nil, 130, 91778, nil, 179, [115435] = 91778},
{nil, nil, 10, 0, nil, nil, 465, 131025, nil, 255, [115435] = 131025},
{nil, nil, 18, 193, nil, nil, 50, 97842, nil, 191, [115435] = 97842},
{nil, nil, 18, 189, nil, nil, 50, 97330, nil, 190, [115435] = 97330}
},
{},
18
{"pairs", "TaxiNodeCoords", <...> "Y", "Z", "Name", [0] = 9999999}
},
{
 <...>
},
{
 <...>
}
}
And there we go, we managed to dump all the runtime data that Luraph is using to execute Lua, but... what does this data mean?
Lets jump back to the pseudo code and have a deeper look at the LuraphInterpreter pseudo code below:
local function LuraphInterpreter(data, env, arg3)
-- Do: setup initial data
local function Main(...)
-- Do: setup more initial data
local VIP = 1
local vm_unk1, vm_unk2 = 21, 12
local vm_instructions = data[4]
local var_2 = 2 -- used as index
local vm_constants = data[5]
local iliI11i1IilI111ii11 = data[1]
local lII1i1IiIilIil1III1 = data[6]
local var_3 = 3 -- used as index
local l111llIi1IIlIl1lIi1 = data[3]
local var_7 = 7 -- used as index

local function unk(...) -- handle VARARGS?
local function InterpretFunc()
	while true do
		local instr = vm_instructions[VIP]
		local OpCode = instr[3]
		VIP = VIP + 1

		-- Do: interpret Luraph OpCode
		 if opcode < 16 then
				if opcode < 8 then
					if opcode < 4 then
						<..>

	end
end
-- Do: error handling
end
setfenv(Main, env)
return Main
end
Please note that the variable unpackedData is renamed to data in the interpreter function.
This function is responsible for setting up a bunch of things, pay close attention to the table indexing used on our data variable.
We can see that, in the next function, InterpretFunc which, is the actual Luraph interpreter that contains all the VM handlers.
Here we should see a bunch of IF statements that we discussed in the first article, the IF statements are used to check which handler should execute the given instruction, meaning that the IF checks are performed on the Luraph OpCode.
Now that we know the OpCode variable we just have to look where it gets defined, and in our case its obtained from instr[3], the instr variable is obtained from vm_instructions[VIP] and finally, the vm_instructions variable is obtained from data[4].
So with that being said, lets have another loop at the data we dumped.
{
4,   -- data[1]
0,   -- data[2]
{2, 2, 2, 2, 2, 2, 2, <..> 2, 2},   -- data[3]
{    -- vm_instructions = data[4]
{nil, nil, 4, 5, nil, 9999999, 0, 0, nil, 0, [115435] = 0},
<..>
},   -- data[5]
{},  -- data[6]
18   -- data[7]
{"pairs", "TaxiNodeCoords", <...> "Y", "Z", "Name", [0] = 9999999}  -- data[8]
},
}
And look at that, I have added a comment to each table so its easy to figure out whats going on.
Now that we know which data represents the vm_instructions, we can take a deeper look at that table.
Luraph obtains the variable instr from vm_instructions[VIP], meaning that this table contains the Luraph instructions.
Finally, lets have a look at a few instr variables, keep in mind that index 3 holds the Luraph OpCode.
<...>
{nil, nil, 4, 5, nil, 9999999, 0, 0, nil, 0, [115435] = 0},
{nil, nil, 15, 6, nil, "pairs", 1, 1, nil, 0, [115435] = 1},
{nil, nil, 15, 7, nil, "TaxiNodeCoords", 2, 2, nil, 0, [115435] = 2},
{nil, nil, 27, 6, nil, nil, 2, 2050, nil, 4, [115435] = 2050},
{nil, nil, 10, 0, nil, nil, 43, 131115, nil, 256, [115435] = 131115},
{nil, nil, 15, 11, nil, "UnlAPI", 3, 3, nil, 0, [115435] = 3},
{true, nil, 30, 11, "GetMapId", nil, 11, 133131, nil, 260, [115435] = 133131},
{nil, nil, 27, 11, nil, nil, 1, 1025, nil, 2, [115435] = 1025},
{true, nil, 30, 12, "MapId", nil, 10, 133642, nil, 261, [115435] = 133642},
{nil, nil, 0, 0, nil, nil, 11, 6155, nil, 12, [115435] = 6155},
{nil, nil, 10, 0, nil, nil, 37, 131109, nil, 256, [115435] = 131109},
<...>
We now have a somewhat decent understanding of how the Luraph VM is handling all of the Lua data.
To me, it looks like every function has 3 numeric constants, probably used to define the number of arguments, return values, and upvalues.
Secondly, there is an empty table in each data entry which may be used for dynamic upvalues and lastly there is the Lua vm_instructions table which seems to be initialized with the OpCode, Registers and even constants.
With that information in mind, we can start to lift our Luraph opcodes to Lua opcodes and continue to figure out what other things the data variable is used for.
Lifting like a Forklift
Before we start automated lifting like a forklift, we must understand what the InterpretFunc function is doing.
So far we already have a pretty good understanding of what is going on, and our goal is to simply identify every Luraph VM handler and then map it against a Lua instruction.
To do so, I will make use of LuaToolkit, especially the LuaToolkit.Decompiler.LuaScriptBlock, this feature allows me to split the whole InterpretFunc into blocks that I can use to easily identify every Luraph handler and the conditions used to reach them.
Example
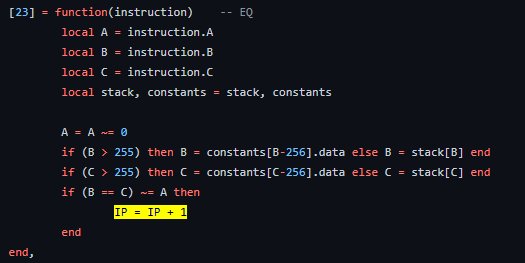
To get a better understanding of how we can lift things I will start by showing you the EQ Lua instruction interpreted by this lua bytecode interpreter.
Followed by the Luraph interpretation of the EQ Instruction
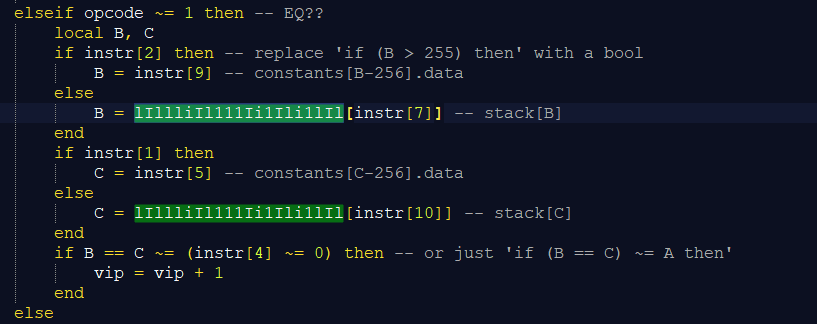
Here we can clearly see that the functionality of these pieces of code are almost equal to each other, but how can we be sure it does exactly what the EQ opcode is supposed to do?
The thing that has to be exactly the same is often the usage of the registers. For EQ we simply have to verify if the Lua block is doing if ((RK(B) == RK(C)) ~= A) then pc++.
Which can easily be done because we have already figured out which variable/table/index represents which register.
Forklift
Once we have created our definitions to identify all 38 Lua handlers we can start performing automated scanning on the Luraph interpreter. For now, I only have identified a handful of handlers because I didnt feel like spending too much time on it.
My handler definitions are listed on GitHub so feel free to play around with them. Below is a screenshot of the result from my auto handler detection tool.
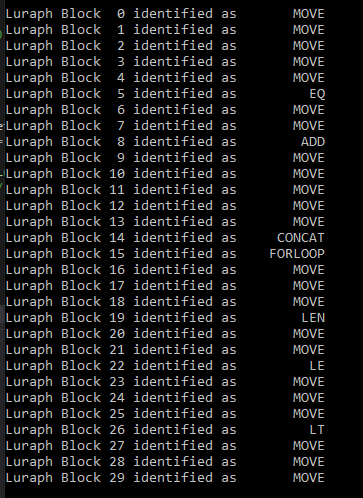
NOTE: Keep in mind that not all handlers are defined, hence why you see duplicated MOVE opcodes.
NOTE2: Not all handlers have been located correctly (if/else bugged out).
Identifying the handlers is only half the work, our next challenge is to find out which Luraph OpCode is assigned to which block. Remember the weird-looking IF statements? It's about time to grab all the IF statements of each block, check if we are located in the true/false body, and continue until we have traversed back to the very first IF-statement of the Luraph interpreter.
Below is an image showing a part of the control flow.
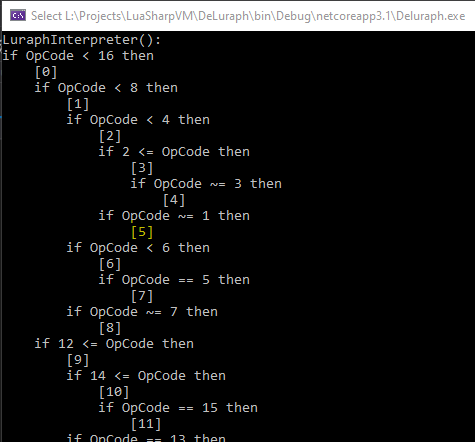
Which we will then use to identify each handler, stripping out every condition that does not relate to our handler will leave us with only a few conditions that we can simplify and turn into a single if OpCode == X to reveal the Luraph OpCode of the handler.
Bytecode Explorer
To make visualizing everything a little easier I created a project named LuaDecompilerExplorer designed with the sole purpose of giving my readers a better visualization of what's going on. You can navigate to functions by clicking on their names, resulting in the unfolding of a few properties of that function.
Since Lua is recursive you can simply keep on unfolding functions of functions to navigate through the whole binary. A little bonus is that the LuaToolkit LuaBlocks are included, which should help visualize the control flow.
Please note that, at the time of writing, the project is far from being complete and neither is the LuaDecompiler from Part 2. This project took me way too much time and I am not planning on finishing it anytime soon. So I figured I may as well include it in the blog post and open-source it for whoever finds any use with it.
NOTE: The project is in a very early stage and has some noticeable bugs in them... as you may know I'm not much of a graphic designer so I couldn't care less.
NOTE2: The project has been discontinued!
Encoding to compiled Lua
Now that we have dumped the Luraph data while also having the lifted Luraph instruction set, we can start to create a Lua binary. Thanks to the LuaToolkit, which not only comes with a LuaDecoder but also a LuaEncoder, we can convert decoded Lua binaries back to an encoded Lua binary file.
Unfortunately, this is not in the scope of the blog post. Not that it's difficult to do, it's just that I want to prevent any skid from copy-pasting my tools and doing harm
Stop, gavel time!
Due to recent DMCA takedowns and other legal bullshit, I have decided to halt the development of my Luraph Devirtualization Toolkit.
It has come to my attention that most of my research will be abused. I wish no harm to the Luraph developer(s) or its users, therefore I have chosen to not finish the full DeLuraph project.
The source code is available on GitHub for those who wish to use it as a reference while going through the article.
With that being said, I still think I managed to do a good job of showing how de-virtualization is done and pinpointing most of its weaknesses, which we will be examining in Part 4. Hopefully, your balls didn't turn too blue as I tried to provide as many examples/code-snippets to show you how de-virtualization is done to make up for this.
Conclusion
After de-virtualizing Luraph we noticed that the Luraph instruction set is one on one to the original Lua 5.1 instruction set. The packing was looking good but we easily skipped the unpacking by using a Lua VM and breakpointing right after Luraph was done unpacked. However, we did reverse some pieces but we have not achieved a full automated de-virtualization. I do respect the developers work and I have no intentions of making a working, out-of-the-box, de-virtualization tool.
All of the research published in this article is purely for educational use only, the projects created around the research can be found here:
De-Luraph - Automated Devirtualization ToolLuaBytecodeExplorer - UI for LuaToolkit results- LuaToolkit - The core library used to handle Lua
In the next blog post, I will attempt to create my own virtualization tool based on everything I have learned from the past few articles. My goal is to provide a custom obfuscation tool based on the knowledge obtained from this research.
Next article: Coming Soon